

A Detailed Guide to Wiring a 6-Wire, 3-Circuit DMX512 Track
By Powerstar

In modern stage lighting, architectural landscape lighting, and intelligent lighting control systems, the DMX512 protocol is the gold standard for controlling dimmers and intelligent fixtures. 6-Wire, 3 phase is commonly used for
Terminal blocks (or rail-type connector strips) are widely used in lighting control boxes due to their ease of installation and neat wiring.
Among them, the “6-wire, 3-circuit” terminal block is a very common configuration. This article will provide an in-depth analysis of its working principle and wiring method.
I. Core Concepts Explained
Before starting, it is essential to understand a few key concepts:
DMX512 Protocol: A digital dimming control protocol that uses the RS-485 electrical standard for data transmission. It uses a single data chain (typically a 3-core cable: Data+, Data-, Shield Ground) to transmit control information for 512 channels.
6-Wire, 3-Circuit Terminal Block
Working Principle: The DMX controller sends control signals. The signals enter a DMX decoder (or DMX driver). The decoder interprets the brightness information for the corresponding circuit based on its set start address and outputs the appropriate low-voltage direct current (e.g., 12V/24V DC) or PWM signal to control the load (e.g., an LED strip) connected to its output ports
The essence of a “6-wire, 3-circuit” terminal block is an integrated wiring hub that neatly consolidates the DMX signal input, DC power input, and the decoder’s multiple outputs, significantly simplifying wiring.
II. Terminal Definitions
The 6 terminals of a standard 6-wire, 3-circuit terminal block are typically defined as follows (Caution: Definitions may vary by brand! Always consult the product manual!):
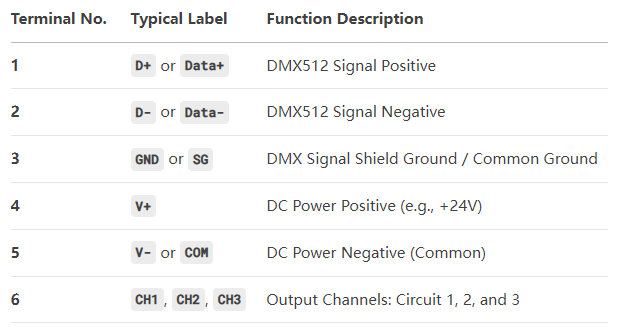
Important Note: Some manufacturers may use the 6th terminal for another output or function. Therefore, checking the manual is the first step for safe wiring.
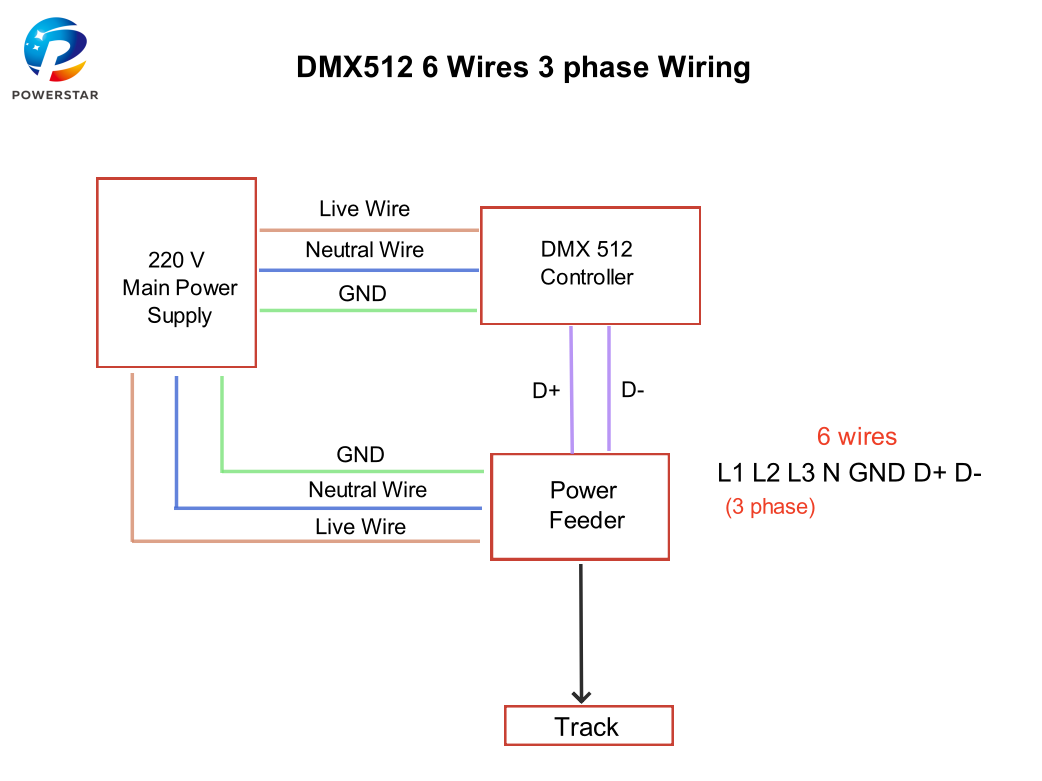
III. Complete System Wiring Steps
Below is a typical system wiring process, including: a DMX controller, power supply, terminal block, and track.
Required Tools & Materials
- DMX Controller
- 24V DC Power Supply (sized appropriately for the total load)
- 6-Wire, 3-Circuit Terminal Block
- LED Strips (3)
- 3-Core Shielded Cable (for DMX signal, e.g., Belden 9841)
- 2-Core Power Cable (for connecting power to the terminal block)
- Wire, wire cutters/strippers, screwdrivers, etc.
Wiring Diagram:
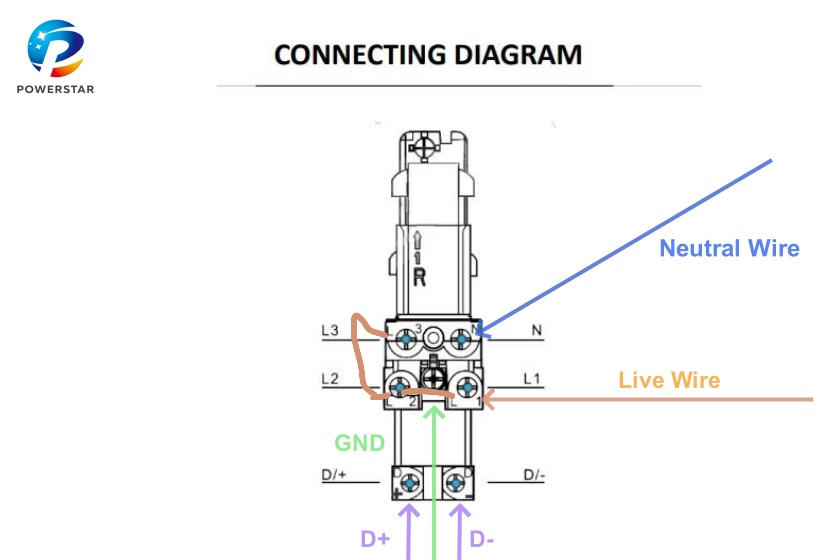
- Connect the DMX Signal Input:
- Connect the DC Power Supply:
- Connect the Load Outputs:
- Address Setting and Power-On Test:
IV. Precautions and Common Issues
- Cable Specification: DMX signal lines must use twisted-pair shielded cable (e.g., Belden 9841). Do not use microphone cable or speaker wire as a substitute, to avoid signal interference and distortion.
- Grounding: The signal shield ground should ideally be connected at one end only (usually at the controller) to avoid creating ground loops that introduce noise.
- Polarity: While DMX’s D+ and D- are not as critical as DC polarity, it is best practice to connect them correctly to ensure system compatibility.
- Termination Resistor: This resistor is crucial for signal integrity in long cable runs or complex electromagnetic environments.
- Power Calculation: Always calculate total power consumption: Total Wattage = LED Strip 1 Wattage + Strip 2 Wattage + Strip 3 Wattage. The power supply’s rated wattage should be > Total Wattage * 1.2.
The 6-wire, 3-circuit DMX terminal block is a highly integrated solution that combines signal distribution, power distribution, and multi-channel output management. Correctly understanding and implementing the wiring method described above allows for the construction of a stable, reliable, and easily maintainable professional lighting control system.
Always remember safety first, and thoroughly read the product manual before practical operation, as this is an indispensable prerequisite for successful wiring.